Apache Ignite pitfalls, part 1. Dockers
This is a series of articles to explore the pitfalls of using Apache Ignite. The main goals of these series are to explain features and difficulties you can encounter while working on Apache Ignite. During the work, I will also explain how to overcome the problems, which will help you save a few hours.
We start from the very beginning, installing and setting up an Ignite cluster on Docker. If you are planning to install it on your workstation, it will work like a charm. However, the situation goes wrong while you install the Ignite cluster on Docker, which is hosted on a different host machine.

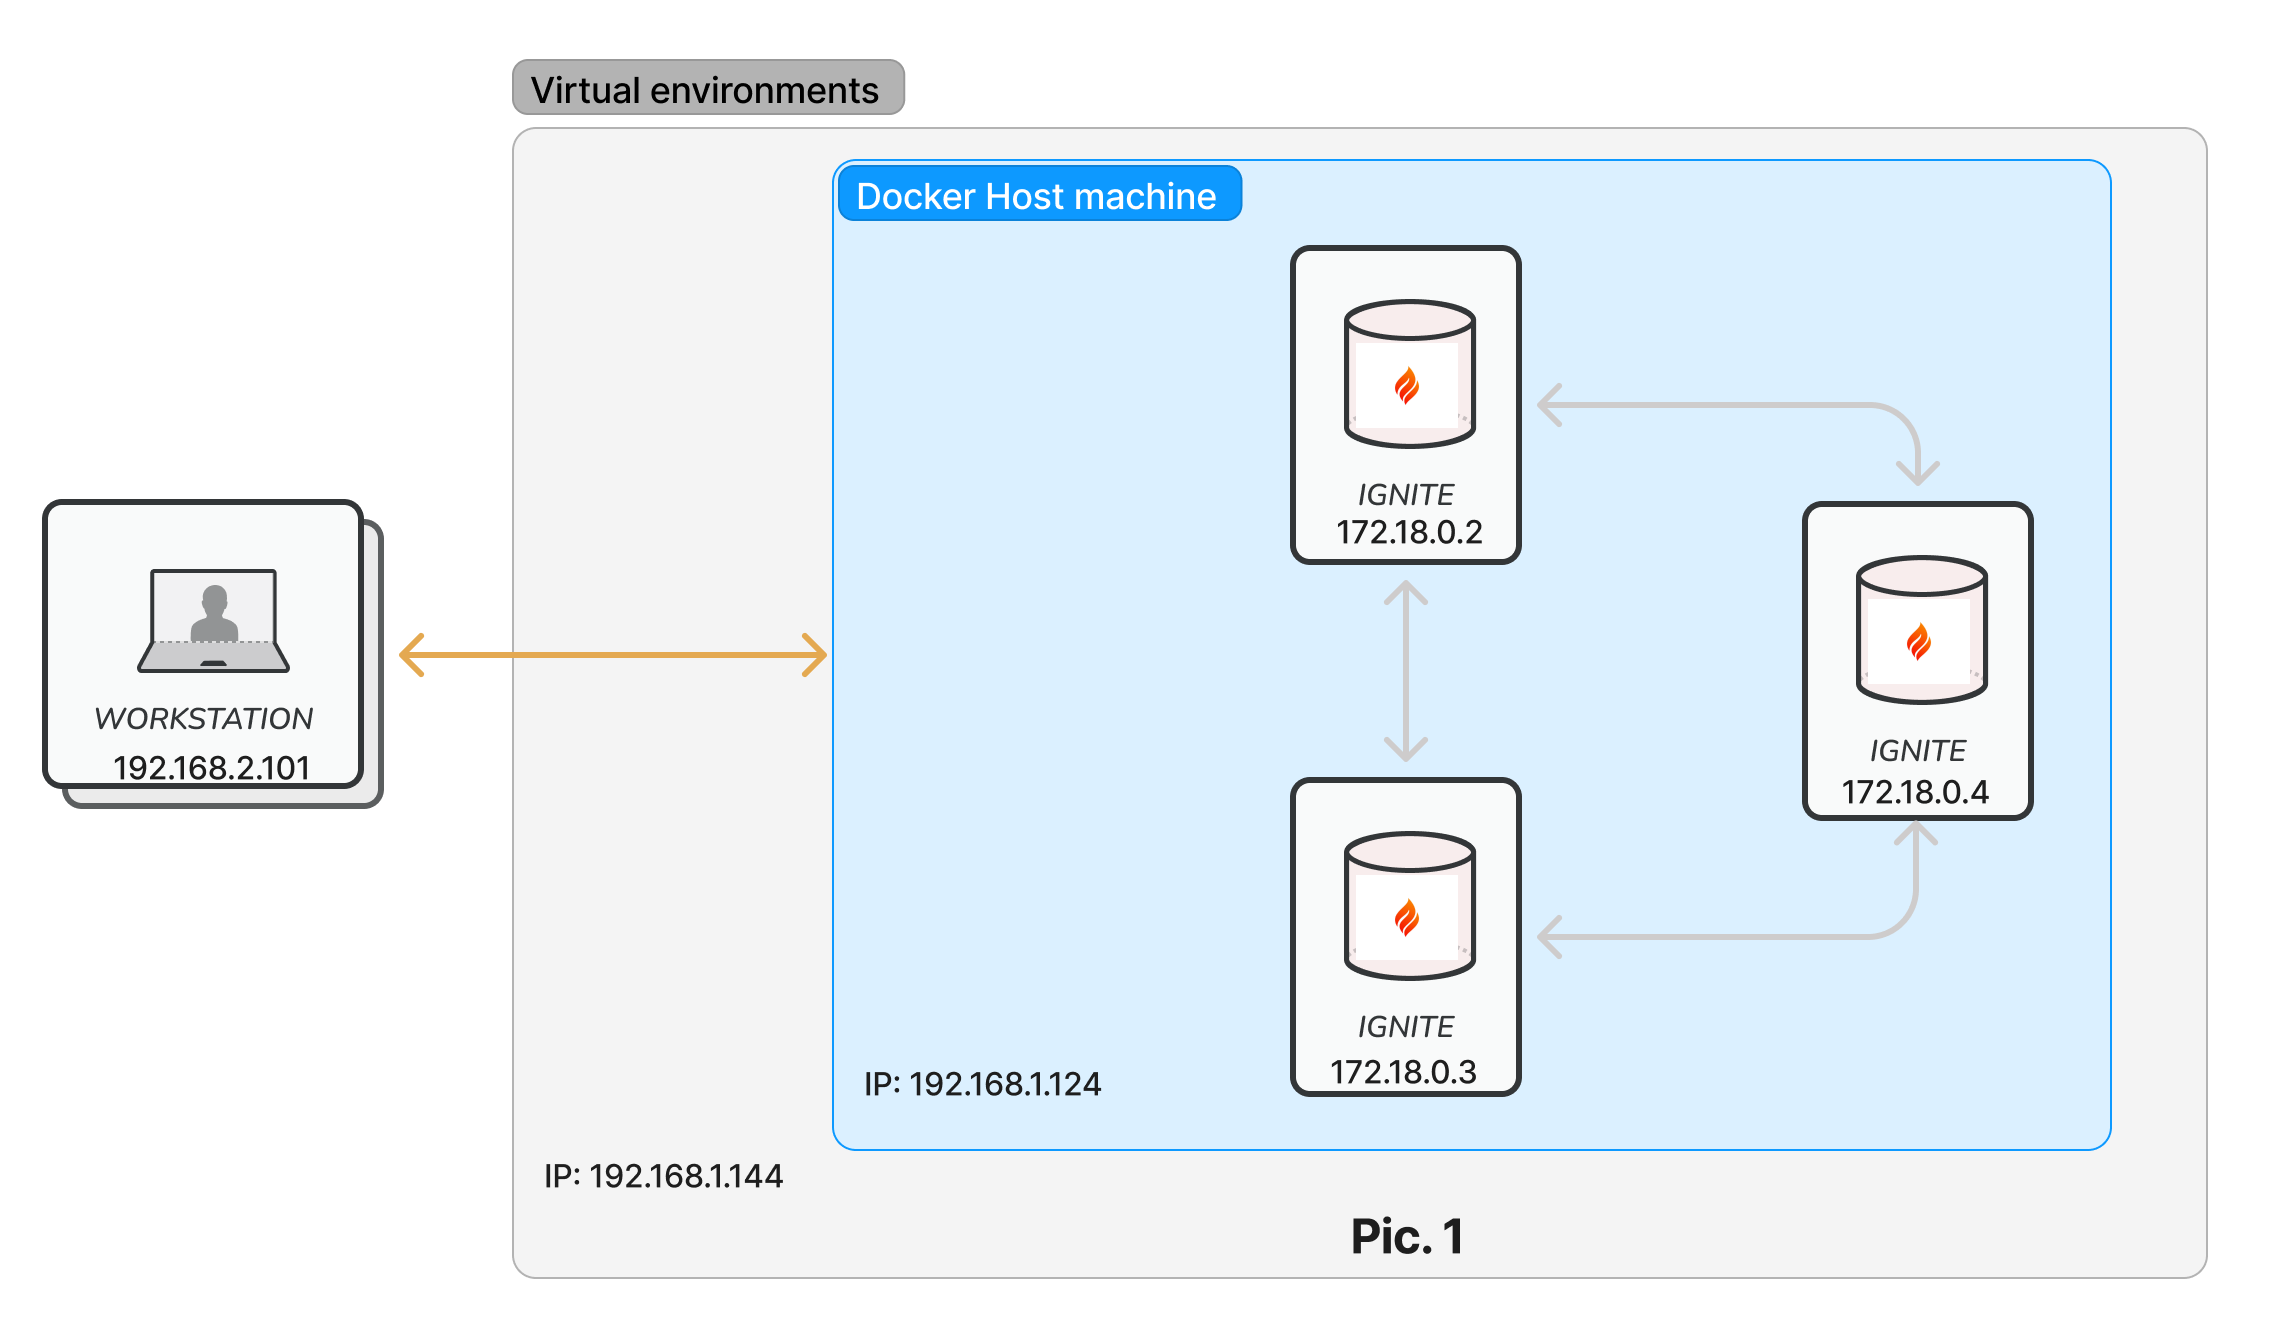
Nowadays, picture 1 illustrates a typical cluster configuration on Docker, where you install and configure Ignite on Docker and want to work with the cluster from your workstation, which can be hosted on different network segments.
If you are an experienced Ignite user, you already know the problems. For newbies, the difficulty is that you can't use the Ignite thick client and the Ignitevisorcmd/control script tool to operate with the Ignite cluster running on a different host.
Note that, basically, an Ignite thick client is an Ignite regular (server) node with the optional notion of client. Both Ignite's thick client and server nodes are part of Ignite’s physical cluster and are interconnected with each other.
In these posts, I am going to deploy an Ignite cluster with three server nodes on Docker and run a few Java applications to answer the question: which client should we use in such a scenario?
Here is the list of tools that we are going to use:
Docker/Docker compose
Ignite docker image 2.14.0
Java 17.0.x
Maven 3.6.*
Step 1: preparation for installation.
Create three local directories on your Docker host machine to store persistence data. In my case, the directories are named node-1, node-2, and node-3.
Download the Ignite 2.14.0 binary from the following link and unarchive the package somewhere on the Docker host machine. In my case, the directory is /home/shamim/workspace/ignite.
Download the Docker compose file from the GitHub project. Edit the yaml file according to your directory path.
version: '3'
services:
  ignite-node-1:
    image: apacheignite/ignite:2.14.0
    container_name: ignite-node-1
    restart: always
    ports:
      - 8080:8080
      - 10800:10800
      - 47100:47100
      - 47500:47500
      - 11211:11211
    volumes:
      - /LOCAL_DIRECTORY_PATH/node-1:/storage
      - /IGNITE_HOME/libs/:/opt/ignite/apache-ignite/libs/user_libs
      - /IGNITE_HOME/examples/config/example-cache.xml:/config-file.xml
    environment:
      IGNITE_WORK_DIR: /storage
      CONFIG_URI: /config-file.xml
      OPTION_LIBS: ignite-rest-http
  ignite-node-2:
    image: apacheignite/ignite:2.14.0
    container_name: ignite-node-2
    restart: always
    ports:
      - 8081:8081
      - 10801:10801
      - 47101:47101
      - 47501:47501
      - 11212:11212
    volumes:
      - /LOCAL_DIRECTORY_PATH/node-2:/storage
      - /IGNITE_HOME/libs/:/opt/ignite/apache-ignite/libs/user_libs
      - /IGNITE_HOME/examples/config/example-cache.xml:/config-file.xml
    environment:
      IGNITE_WORK_DIR: /storage
      CONFIG_URI: /config-file.xml
      OPTION_LIBS: ignite-rest-http
  ignite-node-3:
    image: apacheignite/ignite:2.14.0
    container_name: ignite-node-3
    restart: always
    ports:
      - 8082:8082
      - 10802:10802
      - 47102:47102
      - 47502:47502
      - 11213:11213
    volumes:
      - /LOCAL_DIRECTORY_PATH/node-3:/storage
      - /IGNITE_HOME/libs/:/opt/ignite/apache-ignite/libs/user_libs
      - /IGNITE_HOME/examples/config/example-cache.xml:/config-file.xml
    environment:
      IGNITE_WORK_DIR: /storage
      CONFIG_URI: /config-file.xml
      OPTION_LIBS: ignite-rest-http
Note that I explicitly exposed all 5 ports. By default, Ignite Docker images don't expose the following ports: 11211, 47100, 47500, and 49112. It seems the Ignite documentation has not been updated yet. The port descriptions are as follows:
47100 — the communication port
47500—the discovery port
49112 — the default JMX port
10800 — thin client/JDBC/ODBC port
8080 — REST API port
11211 is the default control script port.
Step 2: Installing using Docker.
Run the following docker command to build the compose file from the directory where you have saved the docker-compose.yml file.
docker compose buildIf everything goes fine, start the cluster of three nodes. Use the next Docker command to achieve it.
docker compose up -dYou can check the status of the running containers by using the following command:.
docker compose psYou should get the following output from the above command:.

Step 3. A few smoke tests.
Apache Ignite out-of-the-box provides an REST-based API to query over Ignite caches. REST APIs can be used for performing diverse operations like read/write from/to cache, execute tasks, get various metrics, and much more. Internally, every Apache Ignite node uses a single embedded Jetty servlet container to provide an HTTP server feature.
Use your favorite web browser or any REST client from your workstation to execute a REST command. For instance, open your preferred browser and type the following URL into the address bar of your browser.
http://IP_ADDRESS_OF_THE_DOCKER_HOST_MACHINE:8080/ignite?cmd=version Inputting the above URL into the browser address bar will return the following JSON response:.
{"successStatus":0,"response":"2.14.0","sessionToken":null,"error":null}Moreover, if you check the log files on any of the Ignite nodes, you should get an output similar to that shown below:

It means that the cluster is in an active state with 3 server nodes.
Now, let's try to use the SQLLINE tool to execute a few SQL queries from the workstation.
Open a bash terminal and run the following command from the IGNITE_HOME directory:
./sqlline.shthen,
!connect jdbc:ignite:thin://IP_ADDRESS_OF_THE_DOCKER_HOST_MACHINE:10800Enter the login and password for the Ignite cluster; by default, it is ignite/ignite.
Note that ./sqlline.sh command with connect parameters will not work. There are a few bugs to fix the error.
Now, try the!tables sql statement, which will show you all the system tables created on the Ignite cluster.
0: jdbc:ignite:thin://192.168.1.124:10800> !tables
+-----------+-------------+-----------------------------+------------+---------+----------+------------+-----------+-----+
| TABLE_CAT | TABLE_SCHEM |         TABLE_NAME          | TABLE_TYPE | REMARKS | TYPE_CAT | TYPE_SCHEM | TYPE_NAME | SEL |
+-----------+-------------+-----------------------------+------------+---------+----------+------------+-----------+-----+
| IGNITE    | SYS         | BASELINE_NODES              | VIEW       |         |          |            |           |     |
| IGNITE    | SYS         | BASELINE_NODE_ATTRIBUTES    | VIEW       |         |          |            |           |     |
| IGNITE    | SYS         | BINARY_METADATA             | VIEW       |         |          |            |           |     |
| IGNITE    | SYS         | CACHES                      | VIEW       |         |          |            |           |     |
| IGNITE    | SYS         | CACHE_GROUPS                | VIEW       |         |          |            |           |
Step 4. Running Apache Ignite thin client.
In version 2.4.0, Apache Ignite introduced a new way to connect to the Ignite cluster, which allows communication with the Ignite cluster without starting an Ignite client node. The thin client connects to the Ignite node through a TCP socket and performs CRUD operations using a well-defined binary protocol.
Download the project from the Github repository. Edit and replace the IP address of the Docker machine in the HelloThinClient.java class as follows:
private static final String HOST = "Docker host machine IP address";Build the project with Maven.
mvn clean installRun the HelloThinClient Java application with the following command:
java --add-opens=jdk.management/com.sun.management.internal=ALL-UNNAMED --add-opens=java.base/jdk.internal.misc=ALL-UNNAMED --add-opens=java.base/sun.nio.ch=ALL-UNNAMED --add-opens=java.management/com.sun.jmx.mbeanserver=ALL-UNNAMED --add-opens=jdk.internal.jvmstat/sun.jvmstat.monitor=ALL-UNNAMED --add-opens=java.base/sun.reflect.generics.reflectiveObjects=ALL-UNNAMED --add-opens=java.base/java.io=ALL-UNNAMED --add-opens=java.base/java.nio=ALL-UNNAMED --add-opens=java.base/java.util=ALL-UNNAMED --add-opens=java.base/java.lang=ALL-UNNAMED -jar ./target/HelloThinClient-runnable.jarNote that I am using Java 17, so I need to specify all the internal classes.
You should see a lot of logs in the terminal. At the end of the log, you should find something like this.

The application connected through the TCP socket to the Ignite node (in my case, node-1, because I opened port 10800 for node-1) and performed a put and get operation on the cache.
So far, so good. We were able to use the REST API, SQLLINE tool, and thin client on the cluster from the workstation located on another subnetwork.
Step 5. The hard part.
Now, let's try an Ignite-thick client to manipulate the Ignite cluster. Edit the default-config.xml file located in the "quick-start-docker/src/main/resources" folder.
In the "discoverySpi" section, change the value of the "addresses" property as shown below:
<value>IP address of the docker host machine:47500..47509</value>and rebuild the project.
Run the application "HelloIgniteSpring" by typing the following command:
java --add-opens=jdk.management/com.sun.management.internal=ALL-UNNAMED --add-opens=java.base/jdk.internal.misc=ALL-UNNAMED --add-opens=java.base/sun.nio.ch=ALL-UNNAMED --add-opens=java.management/com.sun.jmx.mbeanserver=ALL-UNNAMED --add-opens=jdk.internal.jvmstat/sun.jvmstat.monitor=ALL-UNNAMED --add-opens=java.base/sun.reflect.generics.reflectiveObjects=ALL-UNNAMED --add-opens=java.base/java.io=ALL-UNNAMED --add-opens=java.base/java.nio=ALL-UNNAMED --add-opens=java.base/java.util=ALL-UNNAMED --add-opens=java.base/java.lang=ALL-UNNAMED -jar ./target/HelloIgniteSpring-runnable.jarYou should see a lot of logs in the terminal. First, a new Ignite client instance will be created, and it will try to connect to the cluster but fail with errors.

Here we are stuck with the Ignite limitation: the thick client is not compatible with this scenario. The reason is that the thick client is trying to join the Ignite cluster but failed due to port forwarding.
Let's summarise the result:
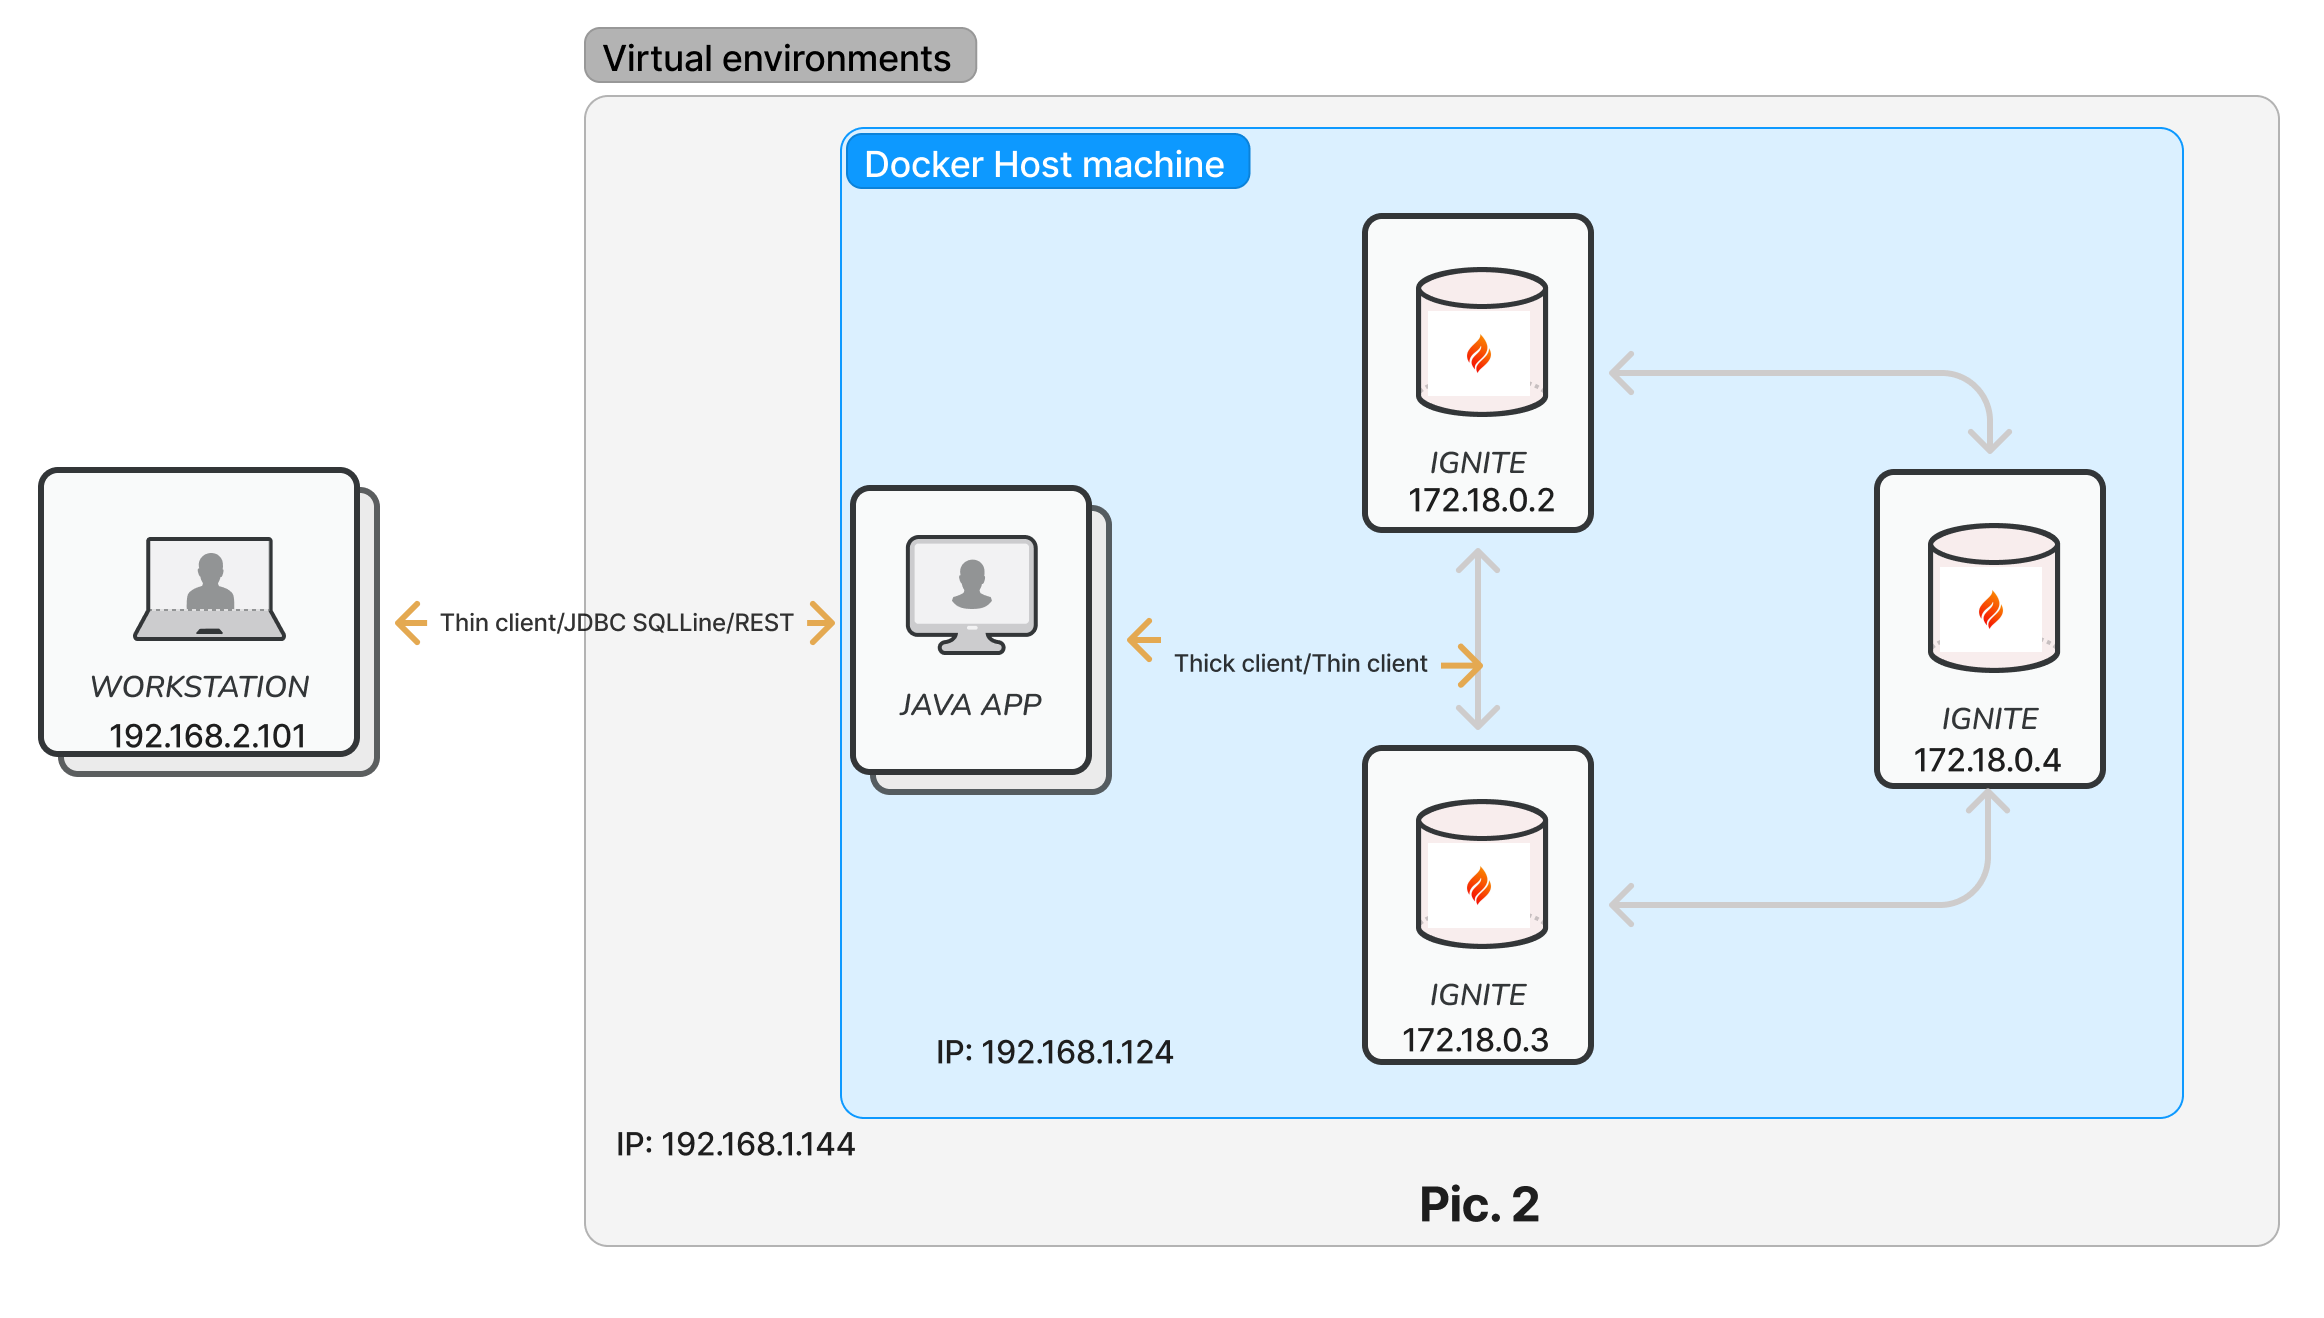
From the workstation outside the Docker host machine, you can use a thin client, a JDBC client like the SQLINE tool, and a REST client.
From the workstation outside the Docker host machine, you can't use the thick client.

How do I overcome the limitation?
Solution 1: Configure port forwarding between the workstation and the Docker host machine.
Solution 2: Run the application from the Docker host machine.